Husband Scarf


I made this scarf for my husband and he LOVES it!!!


Husband Scarf Crochet Pattern - Free!

Yarn: Lion Brand Wool-Ease Thick and Quick
Yarn Weight: Super Bulky, 6 oz, 106 yards
Color: 149 Charcoal
Balls of Yarn: 3.5
Needle: I-5.50mm and N-9.00mm

Husband Comments: I love this scarf because it is long. Most scarves are not long enough.

Husband Scarf Pattern:
Row 1: Use N Hook to Chain 275, Chain 3, turn (It's REALLY long. You could stop at 225 chains for adults and 175 chains for children). Using the larger hook prevents the scarf from curving because the first chain row typically is tighter.

Row 2: Use I Hook to Double crochet in next stitch (front loop), then double crochet until end of row, chain 3, turn.

Row 3: Double crochet in next stitch. Chain 2. Double crochet in next 2 stitches. Repeat to end of row. Chain 3. Turn. (This added a simple design element - see close up photo.)

Row 4: Double crochet in first 2 stitches. Double crochet in the space. repeat to end of row.

Rows 5-8: Double crochet in each stitch (2 loops) to end of row. Chain 2. Turn.

Row 9: Double crochet in each stitch to end of row. Slip stitch to end. Cut end and thread through.

Good Luck and Have Fun!!!

See below for more scarves...


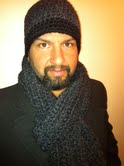
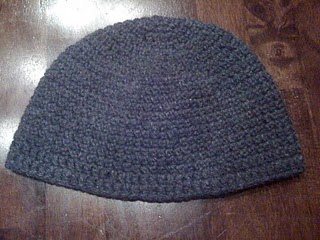
And....If you need a Husband Hat to go with the Husband Scarf...


I made several modifications for different people that I made the scarves for.

Modification One:
For my son who has a gray and orange coat, I chained Row 1, did 3 Double crochet rows, then did Row 3 as above, followed by another 3 rows. Then I chain stitched orange thread and passed through the loops (as in Row 3 above). At the ends, I wrapped around the edge and threaded through.

Modification Two:
For my daughter who is just six years old, I skipped Row 3 (as above) and only did 6 rows. 

Modification Three:
My husband wanted another scarf that was thinner. I skipped Row 3 and just did a total of 6 rows and used a lighter weight yarn. The effect is a "dressy" scarf instead of a warm weather scarf.


Widney Ear Flap Hat

I really wanted a hat with earflaps that looked cute but without a pom pom on top.


After searching for crochet patterns, I just couldn't find what I wanted. I finally found this pattern and was thrilled! It was exactly what I wanted. 

Ron Weasley Animal Crackers Hat

But when I followed the Ron Weasley Animal Crackers Hat pattern, I made the hat too big and it did not turn out well. Not well at all. It's not the pattern, it's me.

So I went to my old faithful - my very own original Husband Hat Pattern

I used a bulky weight wool blend and an H hook.
I added a different color a couple times for a couple rows to mix it up a bit. Then I added the earflaps and from the first pattern I tried (see above). 

And this is what I ended up with...


Pond Friends Stacking Toy


Frog pole, Dragon Fly, Lady Bug, Bumble Bee, Blue Base

I crocheted this for one of my friends who has a new baby. Not sure which friend yet. I have to choose from 10 people who are about to pop out a kiddo.

I thought I could just bang it out because it is simple. It really took a long time to make. J likes it a lot. I don't think he wants me to give it away...

Pattern is Lion Brand Vanna's Choice
Baby Pond Friends Stacking Toy
Pattern Number: 90075AD

Scarfing it Up

I receive weekly e-mails from Lion Brand with a few crochet patterns. Most of the patterns are over my head. One day, a few weeks ago, I spied this scarf pattern my husband's aunt is modeling.

I liked it so much, I made another.
This time, I used the correct needle size.

I think I actually like the larger needle results.
What do you think?

Pink Elephant

Mini Me requested a crochet elephant. Getting an elephant pattern was harder than I thought. I searched and searched and searched. Finally, I found a pattern I liked. Then I found out it was a knit pattern. I need crochet!! I tried to do the stitch conversions, but they didn't work out for me. I'm new at this, remember. 

So, I made it without a pattern. All on my own.
Made it up as I went along. Clearly.

Husband Hat


I did it!! 
I finished a hat for my husband in time for a big snow fall!

After making a hat for his brother, J asked me to make one for him. We went together and J picked out the yarn.

I made this hat a little different from the last one, as I added 2 rows of double crochet stitches at the end, instead of higher up on the hat.

J said he liked it.
He wore it a lot in public and to work.

Now, for the pattern.


HUSBAND HAT CROCHET PATTERN
Pattern Rows 1-10 adapted from Lion Brand Yarn Easy Stripes Hat #70731AD, minus color mixing.

Hook Size: H
Yarn: Lion Brand - Bulky in Charcoal

HUSBAND HAT
With A, ch 4, join with sl st in beg chain (ch) to form a ring. 

R1: Ch 1, work 6 single crochet (sc) in ring, join with sl st in beg ch. 

R2: Ch 1, 2 sc in each sc, join with sl st in beg ch, 12 sc. 

R3: Ch 1, *sc in next sc, 2 sc in next sc; rep from * around, join with sl st in beg ch, 18 sc.  
R4: Ch 1, *sc in each of next 2 sc, 2 sc in next sc; rep from * around, join with sl st in beg ch, 24 sc. 

R5: Ch 1, *sc in each of next 3 sc, 2 sc in next sc; rep from * around, join with sl st in beg ch, 30 sc. 

R6: Ch 1, *sc in each of next 4 sc, 2 sc in next sc; rep from * around, join with sl st in beg ch, 36 sc. 

R7: Ch 1, *sc in each of next 5 sc, 2 sc in next sc; rep from * around, join with sl st in beg ch, 42 sc. 

R8: Ch 1, *sc in each of next 6 sc, 2 sc in next sc; rep from * around, join with sl st in beg ch, 48 sc. 

R9: Ch 1, *sc in each of next 7 sc, 2 sc in next sc; rep from * around, join with sl st in beg ch, 54 sc. 

R10: Ch 1, *sc in next 8 sc, 2 sc in next sc; rep from * around, sl st in beg ch, 60 sc.
(Note: Keep increasing as necessary to fit adult head.)

R11: Ch 1, *sc in next 9 sc, 2 sc in next sc; rep from * around, sl st in beg ch, 66 sc.

R12: Ch 1, *sc in next 10 sc, 2 sc in next sc; rep from * around, sl st in beg ch, 72 sc.

R13: Ch 1, *sc in next 11 sc, 2 sc in next sc; rep from * around, sl st in beg ch, 78 sc. 

R14-19: Ch 1, sc in each sc around, sl st in beg ch. 

R20-21: Ch 1, Double crochet in each sc around, sl st in beg ch. Fasten Off. Weave in ends.

Author's Note:
If you are having problems with this pattern, check your tension. I've followed this same pattern to make over seven more hats. 
I added a few photos to show a new Husband Hat I made for my husband because he lost the first one. There is a partial progress photo to help you see what it should look like partway through.
Below, are some of the hat and scarf sets I made. 


I find that the Husband Hat goes well with the Husband Scarf
(Click for a link to the Husband Scarf Pattern)

Pics of more Husband Hat and Husband Scarf Sets
So easy and fast that I made five sets in less than a month.


Brother-in-Law Hat

My sister-in-law, sent an 'easy' crochet pattern and asked me to make a hat for her husband. Well, I tried. And failed. 
I tried again. And again.

Finally, I had to get Mary Anne to help me. Turns out, I have been crocheting all wrong!! The amigurumi technique may have messed me up, or in my amateurness, I just missed a few things. At any rate, Mary Anne set me straight.
Brother-in-law in his new hat!
I didn't do the original pattern, instead opting for a modified pattern all my own. Crochet is absolutely beautiful when done properly...

And now my husband wants one...

BROTHER-IN-LAW HAT CROCHET PATTERN
Pattern Rows 1-10 adapted from Lion Brand Yarn Easy Stripes 
Hat #70731AD, minus color mixing.

Gauge: 12 sc = 4 in.

HAT
With A, ch 4, join with sl st in beg ch to form a ring.
R1: Ch 1, work 6 sc in ring, join with sl st in beg ch.
R2: Ch 1, 2 sc in each sc, join with sl st in beg ch – 12 sc.
R3: Ch 1, *sc in next sc, 2 sc in next sc; rep from * around, join with sl st in beg ch – 18 sc.
R4: Ch 1, *sc in each of next 2 sc, 2 sc in next sc; rep from * around, join with sl st in beg ch – 24 sc.
R5: Ch 1, *sc in each of next 3 sc, 2 sc in next sc; rep from * around, join with sl st in beg ch – 30 sc.
R6: Ch 1, *sc in each of next 4 sc, 2 sc in next sc; rep from * around, join with sl st in beg ch – 36 sc.
R7: Ch 1, *sc in each of next 5 sc, 2 sc in next sc; rep from * around, join with sl st in beg ch – 42 sc.
R8: Ch 1, *sc in each of next 6 sc, 2 sc in next sc; rep from * around, join with sl st in beg ch – 48 sc.
R9: Ch 1, *sc in each of next 7 sc, 2 sc in next sc; rep from * around, join with sl st in beg ch – 54 sc.
R10: Ch 1, *sc in next 8 sc, 2 sc in next sc; rep from * around, sl st in beg ch – 60 sc. 
(Note: If your gauge lines up, stay at 60 sc to R14. Otherwise, increase to fit adult head as needed.)
R11: Ch 1, *sc in next 9 sc, 2 sc in next sc; rep from * around, sl st in beg ch – 66 sc. 
R12: Ch 1, *sc in next 10 sc, 2 sc in next sc; rep from * around, sl st in beg ch – 72 sc.
R13: Ch 1, *sc in next 11 sc, 2 sc in next sc; rep from * around, sl st in beg ch – 78 sc. 
R14: Ch 1, *sc in next 12 sc, 2 sc in next sc; rep from * around, sl st in beg ch – 84 sc. 
R15-19: Ch 1, sc in each sc around, sl st in beg ch – 84 sc.
R20-21: Ch 1, DC in each sc around, sl st in beg ch – 84 DC.
R22-27: Ch 1, sc in each sc around, sl st in beg ch – 84 sc. 
R28-29: Ch 1, DC in each sc around, sl st in beg ch – 84 DC.
R30-31: Ch 1, sc in each sc around, sl st in beg ch – 84 sc.

BORDER
With B, ch 1, sl st in each sc around, sl st in beg ch.
Additional Row: Ch 1, sc in each sc around, sl st in beg ch. Fasten off.

FINISHING
Weave in ends.

Rocket Ship

Motor Mouth has been asking me to crochet him a rocket ship. I'm a good mommy, so I searched and searched for patterns. Couldn't find one for the life of me! So, with just 2 months of crocheting under my belt, I decided I had the skill and expertise to CREATE a pattern.

USA is written on the side - not a great picture.

Here is the pattern if you are interested

ROCKET AMIGURUMI PATTERN

HOOKS
Body: 4.25 mm
Fins & Tip:  3.75 mm

YARN
Yarn A: Gray, Vanna’s Choice 100% Acrylic 3.5 oz
Yarn B: Black, Vanna’s Choice 100% Acrylic 3.5 oz
I use washable yarn & polyester fiberfill for kids' projects

BODY
With Yarn A, ch 2
Row 1: 6 sc in first ch, 6 sts
Row 2: 2 sc in next st, sc in next st; rep, 12 sts
Row 3: 2 sc in next st, sc in next st; rep, 18 sts
Row 4: sc in each st, 18 sts
Row 5: 2 sc in next st, sc in next 2 sts; rep, 24 sts 
Row 6-8: sc in each st, 24 sts
Row 9: 2 sc in next st, sc in next 3 sts; rep, 30 sts
Row 10: 2 sc in next st, sc in next 4 sts; rep, 36 sts
Row 11-12: sc in each st, 36 sts
Row 13: DC* in each st, 36 sts
Row 14-35: sc in st, 36 sts
Row 36: SC2DEC*, sc in next 4 sts; rep, 30 sts
Stuff with polyester fiberfill
Row 37: sc2dec, sc in next 3 sts; rep, 24 sts
Row 38: sc2dec, sc in next 2 sts; rep, 18 sts
Row 39: sc2dec, sc in each st, 12 sts
Sl st and fasten off and work tail into body.

TIP
With Yarn B, ch 10, turn
2 dc in next 6 st
Sl st and fasten off, leaving tail for attaching to body
Use needle to attach to body through hole in top. 
Note: Chain 1-4 should be inside body for support

FINS - Make 3
With Yarn B, ch  3
Row 1: HDC*** in 2nd and 1st ch, ch 1, turn
Row 2: 2 hdc in each; ch 1, turn, 4
Row 3: 2 hdc in each; ch 1, turn, 8
Row 4: 2 hdc in next st, hdc in next; rep, ch 1, turn 12
Row 5: hdc in each, 12
Sl st, fasten off, and sew to body

*  DC - Double crochet
** SC2DEC - Single crochet decrease
*** HDC - Half double crochet


If you like this pattern or use it, please be sure to leave a comment.

Amigurumi - Bear Cat Whale

I am officially a crocheting amigurumi fool!
I made all of our Christmas gifts for our nieces and nephews in 2008.
Here are 4 projects I made in just over a week.

Bear - So cute, he doesn't need eyes!
Pink Cat - He is HUGE!
 Rt 66 Blue Whale
Historic Route 66 runs through the Oklahoma town J and his family grew up in.  There is an actual Blue Whale on the Route that used to be part of a water park. That history gives this little guy more significance.
Original pattern for Silly Blue Whale

Purple Elephant
I made this! I can't believe I made this!!
In just a few hours, I made this cat.
Amigurumi Cat
Motor Mouth just saw it and said, "Mom! You put it together!! Aw, Mom, it looks better than your bears."

I have to give credit to the pattern originator. I searched and searched, but can't find the link to the person who translated it into English and posted.